
If you want to display your treehouse outside where it may be exposed to the elements, we recommend weatherproofing your model. If you intend to display it on a balcony or other undercover areas, you may get away without varnishing it.
The plywood used to make Tiny Treehouses is untreated and not water proof, and any exposure to rain or excessive humidity can cause the wood to warp and / or rot over time. In this post we’ll show you how to use a clear outdoor weatherproof varnish to make the models more resistant to moisture.
For hanging treehouses, please see note at the bottom of this post.
You will need;

1 Your finished Tiny Treehouse model
2 Clear outdoor weatherproof varnish, plus something to stir it with
3 A disposable plastic or metal tray
4 A disposable cup
5 Disposable gloves
6 Old newspapers to cover your work space
7 Masking tape
8 Tissues
You will also need somewhere to let your model hang and drip dry. We have put together an easy makeshift set up below as a suggestion, but you can set this up in any other preferred way. You will need;
9 2x large water / soda bottles (full, for stability)
10 A stick about 50cm / 20 inches long
11 Tape
12 Thread

STEP 1 Preparing your Tiny Treehouse
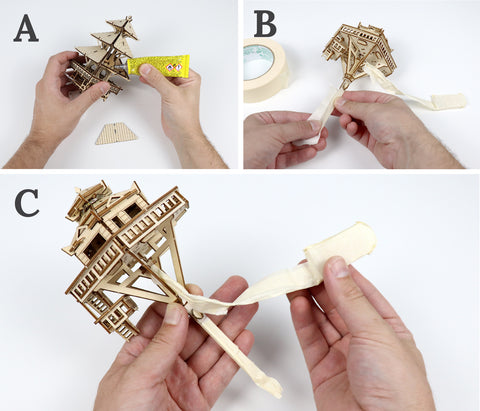
Glue down any loose bits
(A) Making sure your Tiny Treehouse is well built and glue down any loose bits, like furniture pieces or exterior hand rails. Go round your model and check all the joins, then turn your model upside down and give it a good shake to check - You don’t want any bits falling out while you’re varnishing! Make sure your model is also free of any dust or dirt before you start.
Wrap battery compartment and acrylic sections in masking tape
(B&C) Pull out the battery compartment and wrap it in masking tape, including the wire as far as you can reach in the model. Do the same with the acrylic stake (if applicable). We do this to prevent varnish getting on these sections. It’s ok to leave a little bit exposed at the top - you just need to make sure all timber surfaces are exposed.
STEP 2 Prepare your drip drying area
Put plenty of newspaper down in your working area.
(D) If you are following our example, simply tape both ends of the stick to the top of each bottle.
We will hang the model sideways (see image below). To do this, make two loops of thread around the stick (E), then simply loop it around the top and bottom of the model (F). Adjust the lengths of the loop so the model hangs horizontally (G). This is how we will hang the model when it is drip drying. Remove the model from the loops before the next step.

STEP 3 Varnishing
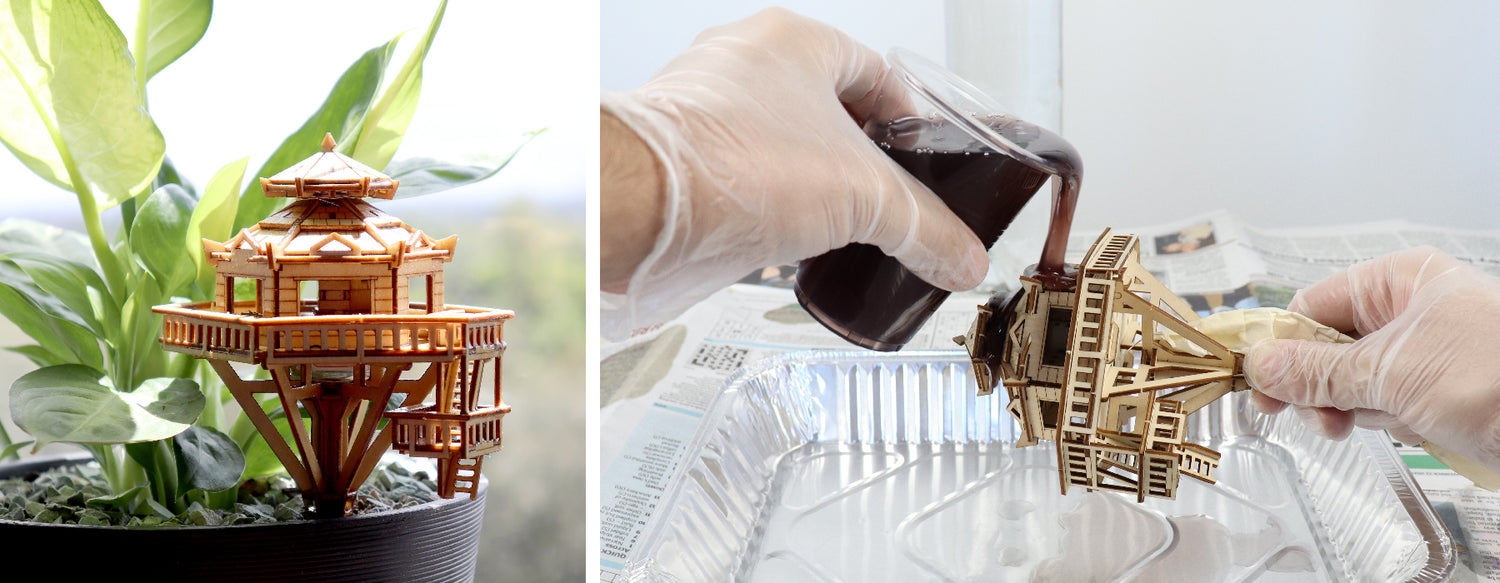
Put on your gloves and prepare the varnish according to the instructions - Most will tell you to give it a good stir before you start. Next, pour the varnish into your cup (H).
Hold your model over the disposable tray with one hand, then start pouring the varnish over with the other. Turn your model around as you pour, making sure you cover all surfaces and cavities (I). If you run out of varnish, tip the contents of the tray back into the cup and go again (J&K).

Once covered, gently shake off the excess varnish and then hang up your model like we did before in the thread loops (L&M). Don’t worry - the thread will not get stuck to the varnish when we remove the model after drying.
IMPORTANT - Turn your model so that a corner is pointing downwards so that the varnish drips off neatly in singular points (N&O). Also make sure that there is no cavity collecting a build up of varnish.
Pour the excess varnish back into the tin and close the lid, then place the tray underneath your model to catch any drips.

(P&Q) Come back to your model every 10 minutes or so and use a tissue to wipe away the drips that form at the points. Keep coming back until there are no more drips forming. You may also use a brush to wipe away any excess build up of varnish.

STEP 4 Repeat
Check the instructions on your varnish to see how many coats you require, and how long you need to wait between them.
Remember to keep wiping away excess build up of varnish.
STEP 5 Remove masking tape
When you've finished applying all your coats and have let it dry the specified time, you can remove the masking tape from the battery unit and acrylic stake (R&S). Use a tissue to wipe away any residue.

And that’s it!
Please note, varnishing your treehouse will vastly prolong the life of your treehouse outdoors, but it will still be susceptible to weathering over time.
We’d love to know how you got on, and if you have any suggestions or issues, please let us know so we can improve this guide for other Tiny Treehouse enthusiasts!
Hanging Treehouses
For hanging treehouses, we recommend varnishing the model without the hanging hooks attached, and then using string to tie up your treehouse after you have finished varnishing.
It is possible to varnish the model with the hanging hook connected so they are stuck together as one, however it creates a vulnerable weak point in the model that can easily break if it falls. If you varnish the hook separately, it will not slot together afterwards.
Make sure your treehouse is securely hung, as it is possible for a strong wind to blow them to the ground.
7 comments
Has anyone painted a treehouse? What paint was used and are there any photos of finished painted treehouses?
These are absolutely incredible. Acrylic washes to give it some colors and shading will bring this to life in a while new dimension. Keep up the amazing work. Looking forward to more designs.
Imposible contactar con ustedes
Tengo un problema de alumbrado de vuestra maqueta del modelo Tropical Lookout
No funciona las luces
The battery operated LED lights are actually water proof, so they’ll be fine!
How do the LED lights and battery compartment fair outdoors?